There are two basic parts that make up reading music, each with it's own set of symbols. One, which is covered in this post, is pitch or the sound the instrument produces. This post introduces you to what those symbols look like and where they live on the musical staff.
The musical staff is simply 5 horizontal lines that run parallel to each other.
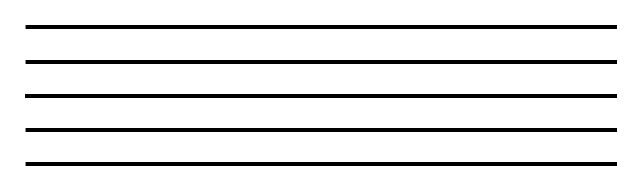
There are 5 lines with 4 spaces in between. All the notes live on this musical staff as well as other symbols that give us information on what or how to play.
The music notes are the oval shaped symbols that reside on the staff.

They are placed on the lines and spaces on the staff and can move in any direction on the staff. These symbols and their specific placement on the staff indicate which pitch or sound to produce on the instrument.
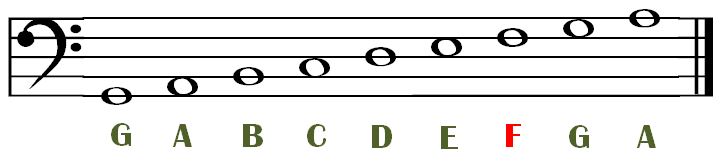
The location of the note on the staff determines how high or low the pitch will sound. The lower the note is on the staff, the lower the note is in pitch. The higher you find the note, the higher it will sound.
Like reading words, we read music left to right. Also, much like English, there is a musical alphabet. The musical alphabet is very similar to the English alphabet; it uses the first 7 letters:
A B C D E F G
When G has been reached, the alphabet goes back to the beginning and starts the cycle all over again. These are the only letters we use to name notes (there is no H!).
Where all these notes and their assigned letter names live on the staff depends on which clef symbol is placed at the beginning of the staff. Though there are 3 different types of clef symbols, in cello we primarily use the bass clef. It is the clef that is used for all the lower pitched instruments (such as the bass, bassoon, trombone and lower voices).


Then, we can figure out which string or finger placement all these notes correspond to. First, we need to establish the cello hand finger numbers. On the left hand, pointer finger is finger number 1, then we continue labeling until we reach the little finger, or finger number 4. The thumb is just thumb!

Below is the names and the finger numbers on each individual string, starting with the highest string, the A string.


As you can see, as the notes go up, they progress through the alphabet in order.
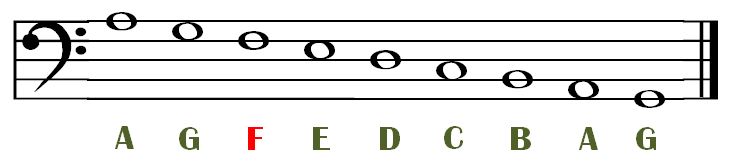
When the notes go down the staff, they go backwards in the alphabet.
If we were to draw out a grid with all the note names and finger numbers on all four strings, below is what it would look like. Reading left to right, is lowest string to highest (as if you were looking straight on at the fingerboard). The finger numbers are to the far right, beside the A string.

Please note that 2nd finger is not included. In the beginning, we don't use 2nd finger, but we will eventually! This just simplifies things. There are many more notes that go on this grid and as students and parents learn more, those notes can be filled in on a physical note grid or on the cognitive note grid/fretboard we have in our minds.
When I think about the notes in the cello, I am quite literally thinking about an imaginary fretboard on my instrument and all the notes we play live on that fretboard. My goal is to develop the same thinking in my students. This leads to a much more flexible and fluent approach to playing the cello - we can navigate the whole instrument no matter which fingering or position is required of us.
Later on, we end up with something like this, but mapped out in our brains!

Back to the staff, you'll notice on the C string and the A string, some of the notes dip below the staff as well as above. Especially in the case of the A string, there are more notes above and below the staff. Our open C string is as low as we will go. However, the A string notes can continue getting higher and higher. In order to indicate those notes on the staff, we use ledger lines. The purpose of ledger lines is to give us freedom to write notes above and below the staff as we need them. Basically, they are an extension of the musical staff.
Just like on the staff, as we you move in ledger lines, the notes get higher and you go forward in the alphabet.
The reverse is true for going down in ledger lines - the notes get lower and you go backwards in the alphabet.
Just note (hahah, no pun intended) that we will never go below this pitch because it is our lowest string and we cannot go lower:

This covers the basics for pitch on the staff and some fingerboard geography and should help you as you learn along side your child how to read music. Music reading is pretty easy but it does take some time to get the hang of it and become fluent and comfortable. But just keep in mind, these are the basics and we continue to build on these skills as we learn more notes (like second finger!).
What I've not covered is rhythm. Look for another post about rhythm!
Though I've separated pitch and rhythm, understanding both and their corresponding symbols is integral to reading music. You will not get all of the information just by reading the notes or vice versa, only reading the rhythm. Music is made up of both. It's just easier to digest by breaking it up. :)
What a wonderfully clear 'primer' to the cello fingerboard, and fun to read. Big thanks!
ReplyDeleteThanks for infomation.
ReplyDeleteSo who is John Tallon Jones? Well, he has been around a long time, and cannot really be defined easily. violin teacher
ReplyDelete