Showing posts with label reading music. Show all posts

Monday, March 23, 2015

Reading Music, part 4 - The Next Level of Rhythm

Now that you know all the basic symbols for rhythm, we have to organize all those symbols in a meaningful way.  

But first, let's review what the beat is and how to find it. The beat is the steady rhythm of music, just like your heartbeat. If you can match your heartbeat by tapping to it, you can match the beat of any piece of music.

From here, we organize rhythm on the staff. Bar lines divide the staff into equal sections, or measures. Measures may also be referred to as bars. A double bar line denotes the end of the piece. 


The lines make reading music easier as they divide up the all information on the page into smaller sections.  

Each measure will contain a specified number of beats. This amount is specified at the beginning of the music, after the clef symbol, in the time signature. The time signature looks like a fraction symbol at the beginning of the music. It's not a fraction! Please remember this or it will totally confuse you!

A time signature defines the amount and type of notes that each measure contains. There are a variety of different time signatures and each one specifies a different amount of beats for the measure.


4/4 is perhaps the most common so I will use it as an example. 

In the time signature, the top number represents how many beats are in one measure. Not notes, but beats. So in 4/4, there will be 4 beats. A single measure can contain one note, a whole note, but that whole notes equals 4 beats. There are infinite measure combinations to reach 4 beats but the key fact is that the measure will contain 4 beats. 

The bottom numbers defines which type of note equals one beat. When you are tapping the beat in a 4/4 time signature, you are tapping a quarter note. 


If the bottom note is a 2, the beats equals a half note; it it's an 8, eighth note. But don't worry about time signatures with 8 as the bottom number - they are slightly more complicated and make more sense once you and your child get the hang of time signatures and how it relates to rhythm and the beat. 

Just for fun, there are various types of time signatures and a single piece may have different time signatures. In other words, the time signature may change at any point in a piece. A piece may start in 4/4 but can change to 2/4 or 3/4 at any point. 

The various types of time signatures are: 

simple: 3
4
 or 4
4


compound: 9
8
 or 12
8


complex: 5
4
 or 7
8


mixed: 5
8
 & 3
8
 or 6
8
 & 3
4


additive: 3+2+3
8


fractional: 2½
4


irrational: 3
10
 or 5
24


But keep in mind, you and your child will only really encounter simple and compound meters. And the compound meter doesn't even show in the Suzuki literature until Book 2. So don't worry about the others - I just find it neat to see all the different (crazy!) time signatures! 

Last music reading post, I outlined a number of different rhythmic values and their symbols. However, what I left out was dotted rhythms. These notes look similar to half notes, quarter notes, whole notes, eighth notes, etc., however, they have a dot attached.


This dot does impact the duration of the note. It involves a bit of math to figure out but here's how:


Add half the value of the note, to the note. For a dotted half note, you take the half note (2 beats) divide it in half (which equals 1 beat) and add that back to the half note, for a total of 3 beats.
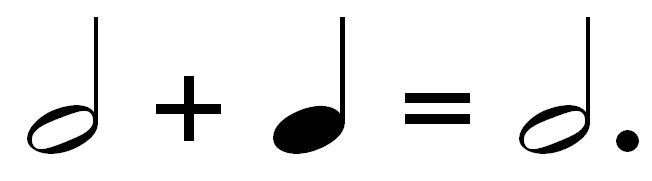


This same rule applies to every note that is dotted. Take, for instance, a dotted quarter note:


Half of a quarter note is 1/2 a beat, or 1 eighth note. 1 quarter note plus 1 eighth note equals 1 and 1/2 beats. 
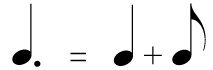

Typically, we see a dotted quarter note immediately followed by another eighth note, which equals 2 full beats.


We see this in May Song and The Happy Farmer. Look for these there! 


***

This is by no means a complete list of everything music reading related. There are many more dotted rhythms and time signatures, rhythms and rests. But these are the basics to get you started with music reading. These things are also a starting point to build on as you and your child learn more about the symbols and reading music. Also, this works so much better when you actually put it into practice and do it versus reading it on a blog. :)

Monday, March 2, 2015

Reading Music, part 3 - The Basics of Rhythm

A few posts ago, I discussed the basics of reading pitch and how to read pitch. The other component to music reading is rhythm. Without rhythm, our music would sound like a robot talking rather than natural human speech.

First step to learning about rhythm and more specifically, how to read rhythm is to find the beat of any piece of music. The beat is the steady rhythm of music, just like your heartbeat. If you can match your heartbeat by tapping to it, you can match the beat of any piece of music.

However, this does take concentration and if you get distracted, you will likely lose the beat. Keep track of it - the beat is the most basic element of rhythm and you'll need it to organize everything rhythm-related around it.

Take Twinkle,  Twinkle Little Star for example - can you tap the steady beat? Not the rhythm, but the ever persistent, never stopping beat. If you are familiar with a metronome, a metronome provides a steady, constant beat.

Rhythm is the organized pattern of sound. It's related to the beat in that we organize rhythm around our beat. It does not matter how fast or slow the beat is, we can still organize our rhythm around this basic element.

Once we can find the beat and identify the different between the rhythm and the beat, we discuss how all this looks on the page. How do we know how long to hold a note?

There are symbols with different note values that tell us how long (or short) to hold a note. The duration is always based on the established beat.

But first, here are the basics of the symbols we use to indicate how long or short to hold a note. How long or short the note is to be played is based on it's appearance.

Every note is made of a note head and a stem. Sometimes, there is also a flag.


Each of these things, the presence or absence, will impact the duration of the note. 

The chart below tells is a great quick reference to the symbol, it's name and how many beats it is assigned. 


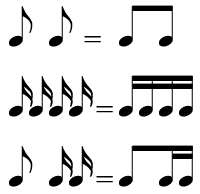
However, more often than not, we see eighth notes and sixteenth notes in groups of two or more. Those symbols look slightly different only in that the flags are then connected together to create beams across multiples. Instead, they look like this:


This just makes reading a sequence of eighth notes easier to read. 

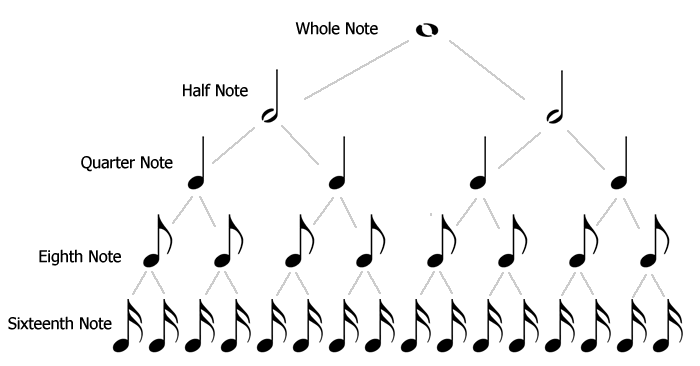
The next image is a note hierarchy which indicates how the durations of notes are related to others. At the top is a whole note. A half note is half the duration of a whole note, so a whole note is as long as two half notes. Likewise, a half note is as long as two quarter notes. A quarter note is as long as two eighth notes, and an eighth note is as long as two sixteenth notes, so on and so forth. 


Now these symbols are used for pitches and indicate the duration of the pitch. There is a different (yet very similar) set of symbols used to indicate the duration of silence in music. We call silence in music a 'rest'. There is a symbol with equivalent values to corresponding note duration to indicate silence. Therefore, there is a whole rest, half rest, quarter rest, etc., just like the notes. Just like our note head and stems, rests can have flags, too, that indicate shorter and shorter rest duration. 


See the below chart for note values and their corresponding rests.


Just like we count to hold the duration of a note, we count to hold a duration of rests. Please try to not blow through the rests and ignore them! The silence in music is just as important as the sound! 

There are a few other items related to rhythm, but I'll cover that in another post. Again, these are the basics to get you started. The other items I leave until later to introduce to students until they have a firm grasp on the basic concepts of rhythm. 

Stay tuned! Part 4 will cover: bar line and measures (how we organize music), time signatures & dotted rhythms. 

Monday, February 16, 2015

Reading Music, part 2 - The Basics of Pitch

Music reading is a huge component to playing an instrument. As you work with your child during the home practice, you will end up learning to read music with your child. What a cool thing!

There are two basic parts that make up reading music, each with it's own set of symbols. One, which is covered in this post, is pitch or the sound the instrument produces. This post introduces you to what those symbols look like and where they live on the musical staff.

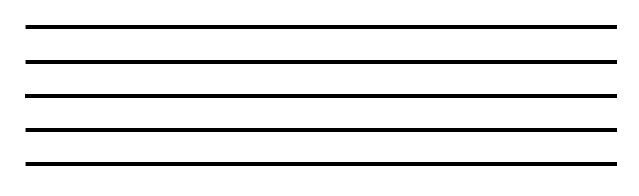
The musical staff is simply 5 horizontal lines that run parallel to each other.


There are 5 lines with 4 spaces in between. All the notes live on this musical staff as well as other symbols that give us information on what or how to play. 

The music notes are the oval shaped symbols that reside on the staff. 


They are placed on the lines and spaces on the staff and can move in any direction on the staff. These symbols and their specific placement on the staff indicate which pitch or sound to produce on the instrument. 

The location of the note on the staff determines how high or low the pitch will sound. The lower the note is on the staff, the lower the note is in pitch. The higher you find the note, the higher it will sound. 

Like reading words, we read music left to right. Also, much like English, there is a musical alphabet. The musical alphabet is very similar to the English alphabet; it uses the first 7 letters: 

A B C D E F G

When G has been reached, the alphabet goes back to the beginning and starts the cycle all over again. These are the only letters we use to name notes (there is no H!). 

Where all these notes and their assigned letter names live on the staff depends on which clef symbol is placed at the beginning of the staff. Though there are 3 different types of clef symbols, in cello we primarily use the bass clef. It is the clef that is used for all the lower pitched instruments (such as the bass, bassoon, trombone and lower voices). 


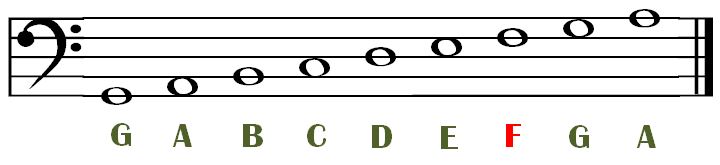
Now we can discuss which notes on the staff correspond to our open strings. An open string is a string that has no fingers placed on it. Remember the Ants Song? These are the symbols for those notes.


Then, we can figure out which string or finger placement all these notes correspond to. First, we need to establish the cello hand finger numbers. On the left hand, pointer finger is finger number 1, then we continue labeling until we reach the little finger, or finger number 4. The thumb is just thumb!


Below is the names and the finger numbers on each individual string, starting with the highest string, the A string. 


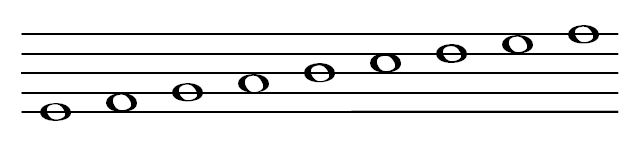
As you can see, as the notes go up, they progress through the alphabet in order. 


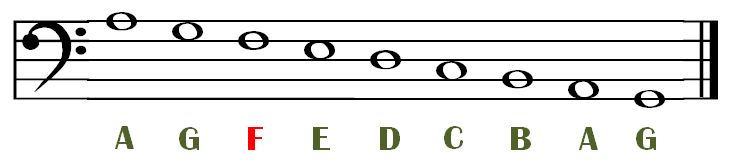
When the notes go down the staff, they go backwards in the alphabet. 


If we were to draw out a grid with all the note names and finger numbers on all four strings, below is what it would look like. Reading left to right, is lowest string to highest (as if you were looking straight on at the fingerboard). The finger numbers are to the far right, beside the A string. 


Please note that 2nd finger is not included. In the beginning, we don't use 2nd finger, but we will eventually! This just simplifies things. There are many more notes that go on this grid and as students and parents learn more, those notes can be filled in on a physical note grid or on the cognitive note grid/fretboard we have in our minds. 

When I think about the notes in the cello, I am quite literally thinking about an imaginary fretboard on my instrument and all the notes we play live on that fretboard. My goal is to develop the same thinking in my students. This leads to a much more flexible and fluent approach to playing the cello - we can navigate the whole instrument no matter which fingering or position is required of us. 

Later on, we end up with something like this, but mapped out in our brains!


Back to the staff, you'll notice on the C string and the A string, some of the notes dip below the staff as well as above. Especially in the case of the A string, there are more notes above and below the staff. Our open C string is as low as we will go. However, the A string notes can continue getting higher and higher. In order to indicate those notes on the staff, we use ledger lines. The purpose of ledger lines is to give us freedom to write notes above and below the staff as we need them. Basically, they are an extension of the musical staff. 

Just like on the staff, as we you move in ledger lines, the notes get higher and you go forward in the alphabet. 


The reverse is true for going down in ledger lines - the notes get lower and you go backwards in the alphabet. 


Just note (hahah, no pun intended) that we will never go below this pitch because it is our lowest string and we cannot go lower:


This covers the basics for pitch on the staff and some fingerboard geography and should help you as you learn along side your child how to read music. Music reading is pretty easy but it does take some time to get the hang of it and become fluent and comfortable. But just keep in mind, these are the basics and we continue to build on these skills as we learn more notes (like second finger!). 

What I've not covered is rhythm. Look for another post about rhythm!

Though I've separated pitch and rhythm, understanding both and their corresponding symbols is integral to reading music. You will not get all of the information just by reading the notes or vice versa, only reading the rhythm. Music is made up of both. It's just easier to digest by breaking it up. :)


Monday, February 9, 2015

Reading Music, part 1 - When do you start reading music?

I thought I'd break down reading music into a couple of different parts. It's a meaty subject so one post is waaaaay too much information.

First, in this series of note-reading, is a discussion of when students begin reading music. It is one of the most frequently asked questions so I thought I'd address it before delving into the mechanics of reading music.

Reminder: this happens at different ages and stages for every student. There is no prescribed age, piece or magical calendar date when we start reading. I look for a number of things before I believe music reading is appropriate to add to a student's repertoire of skills.

First off, we delay reading because that's also how we learn language. We don't start reading words when we began speaking - it happens much later, often many years later. Children become quite fluent in their language before reading is introduced. Learning to read music is exactly the same process. Musical skills, playing beautifully and playing in tune must happen before music reading is begun.

Before introducing music reading I look for these things:

1. Posture, posture, posture
I cannot stress enough how important it is to first and foremost have secure, solid and correct posture. Music reading requires adding an additional skill on top of everything a student already knows, which also requires focused attention. One cannot focus on cello hand position, intonation, bow hold, bow control AND reading music off the page. It's just too much! Posture has to be absolutely solid before adding a new skill. Just like building a house, you can't build on shaky foundation or else everything will fall down.

2. Confidence and ease of playing
Similar to posture, all the skills related to playing the cello must be easy, comfortable and confident. Again, adding too much will result in too many things going on which leads to frustration. If any one aspect is not near automatic, it becomes infinitely more difficult to add an additional and complicated layer. Music reading inherently takes attention away from everything else so that means everything else has to be fluent and easy in order to dedicate brain power to reading. All the previous skills have to be comfy, easy, solid and secure.

3. Knowledge of fingerboard geography
Fingerboard geography refers to the names of the pitches and where they live on the instrument. This must be learned and ingrained before reading music. Students need to be able to identify the notes by name on the instrument as well as locate any given pitch. For example, can they name the notes in Twinkle? Can they find F# on the D string? What is the name of the note underneath the 4th finger on the A string?

To further complicate things, unlike the piano, a single note may live in more than one spot. For example, the pitch of our open D string can also be played on the G AND the C strings. Having the beginning stages of a cognitive map of the fingerboard is absolutely essential to understanding this especially when we start moving the hand around the instrument. We build on this cognitive map as we learn more pitches but a foundation must be there first.

Students must know the names of the notes and where they live on the instrument before attempting to read. It's like trying to identify a color you've never seen before or trying to read and understand the word 'car' when you don't know what that object is. There must be prior knowledge of the 'language' (i.e. names of the notes and where they live) before attaching a symbol to that language.

Then, students must be able to identify the written note symbol on the page by the name of the note, not the finger number. This is critical but not difficult. It's very much like recognizing letters of the alphabet. However, all too often do students learn to 'read' music by following finger numbers. It's not a bad way to start but it becomes a problem when 4 on D (the note G) is indicated to be played with a 2nd finger. In other words, when the hand is no longer in one position on the neck and the hand starts moving around and shifting to different positions. I avoid this approach all together and try to rely on finger numbers a little as humanly possible.

Keep in mind, the finger numbers all throughout the Suzuki books are for you, the parent, not the child.

4. Understands reading concept
Reading music is not unlike reading words. It's essentially the exact same concept just a different 'language', if you will, with a different set of symbols. Understanding the basic concept of reading words is necessary because the two skills are so alike. Then students can apply the same concept and understanding to reading the symbols of music.

5. Solid concept of intonation
Students need to have a solid concept of sound, intonation and pitch. Without this, notes are near meaningless. 3rd finger is not F# if it's not on the correct spot on the fingerboard and F# is not F# unless the right pitch, the right frequency, produced by putting the finger in the correct place. It's either F# or it's not. Much like the color 'red' is not 'red' unless light waves form the correct wavelength. This aspect of playing has to be solid and understood, though it's not necessarily explicitly explained.

String instruments are challenging in that we can't just hit a key and F# is perfectly in tune. There's unfortunately a lot of wiggle room in terms of where the finger can go. This is where the concept of intonation and what's 'in tune' is so important. Even though students are in no way expected to understand or know about harmony, music theory and the physics of sound, they can still learn to hear when a pitch is too low or too high relative to other pitches.

***

There are a lot of skills involved in reading music plus a lot of dots of information that need to be connected in order for all this knowledge to be readily accessible, usable and applicable.

Students need to be able to take in a lot of information, translate it to meaningful knowledge and use that knowledge to produce sound. This means juggling, sorting through and interpreting a lot of information. For example, the page will be a note on the staff and a finger number, which students need to figure out what that pitch is and where it lives on the instrument. Also, students will have a sound concept in mind of what that pitch should sound like, much like singing a tune in your head (read about audiation for more about this). Then there's a physical skill attached to make the sound happen that involves placing the indicated finger down in the right spot, on the right string and hearing whether or not that is the correct pitch. Whew.

All these bits and pieces of information need to be weaved together in order for music reading to become fluent. If one aspect of music reading is weak, it can impact the skill as a whole.

This takes time. Lots of time. It's totally okay if it's slow going at first especially because there is so much new information and it just takes time and practice to sink in. I don't expect this to make sense or 'click' the first time it's explained because it just won't. But rest assured, it will sink it and it will make sense. This goes for many musical concepts, by the way.

One more reassuring note, I typically start music reading about halfway through Suzuki Book 1, when students reach Perpetual Motion. By this point, students have typically achieved all of the above things, whether they know it or not. Most of these things are built into my curriculum and sequence of teaching. So even though I don't explicitly say it, we are preparing for music reading all the time! And it all begins with posture. :)

Monday, February 2, 2015

Learn how to speak Italian! (so you can follow the directions in the book)

In addition to learning how to read music, students also get to learn some fun and very important Italian words! Traditionally in music, instructions for the speed (tempo), bow style, dynamics (loudness/softness), etc., are in Italian. Some composers later on use French and German, depending on their nationality, but for the most part, Italian instructions are used. And for the entire Suzuki Book 1, Italian is used.

Below is a list of commonly used Italian words as well as symbols broken up by the type of instruction they give. This is by no means a comprehensive list - there are as many symbols and terms to fill up an entire encyclopedia of music (these exist) but this will cover you through Book 1.

Tempo (speed)

  • Allegro - fast, lively, 'perky'
  • Allegro giocoso - fast and playful
  • Allegro moderato - moderately fast
  • Allegretto - fairly brisk tempo but slower than Allegro
  • Andante - walking speed
  • Andantino - slightly slower than Andante
  • Grazioso - gracefully
  • Moderato - moderately; moderate speed

Dynamics (how loud or soft)

  • forte (f) - loud; 'strong'
  • piano (p) - soft
  • mezzoforte (mf) - medium loud
  • mezzopiano (mp) - medium soft
  • cresc./crescendo/ < - gradually get louder
  • dim./diminuendo/ > - gradually get softer
  • decresc./decrescendo/ > - gradually get softer
  • meno mosso - much less

Bow Articulation Marks (what kind of sound does it make)

  • legato - smoothly; French Folk Song
  • staccato - short, crisp; marked with a dot above the note; Song of the Wind 
  • tenuto - to hold; marked with a dash above the note; Allegretto
  • marcato - strongly articulated; marked with a > or ^; 
    • related to martelĂ©, or an attack with the bow that is forceful and then released; think Rigadoon. 
  • detachĂ© - connected, on the string; back and forth bow; long bow Twinkle

Other Directions

  • pizzicato or pizz. - pluck with the finger
  • arco - use the bow
  • rit./ritardando - slow down
  • poco rit. - slow down a lot
  • dolce - sweetly
  • a tempo - return to the original speed
  • sempre - always

Commonly Used Symbols


Wikipedia has a great glossary of terms & symbols for any additional terms or symbols you may need going forward.