Monday, February 23, 2015

Are you reviewing?!

Hey, are you reviewing old pieces daily? If not, here's a great way to do it! Follow the chart to break up review into smaller portions. That way, you are not reviewing everything, everyday (that might be a lot depending on what book you're in) but you do cover everything in the span of a week.

It's easy to get excited about a new piece but don't forget about review pieces. The skills in the Suzuki repertoire are scaffolded so everything that was previously learned is built on later but made more challenging. When reviewing an old piece, ask your child to think about something specific so it is not mindless repetition of an old song. For example, if your child is working on fixing some bow hold issues, have them play Twinkle and really focus on the bow. The left hand will practically play itself and the additional focus on the bow with reinforce bow hold maintenance. 


Suzuki Cello Review Chart for Books 1-4

1. Practice your last 3 pieces everyday
2. Twinkle Variation X is “Flipper the Dolphin”, “Blueberry Blueberry” or any Twinkle rhythm not from the book
3. On the 6th and 7th day, you may choose what to review. Hint: review what didn't go so well!
4. When you are in Book 3 and beyond, you can substitute orchestra/other music for Book 1. 


Day 1Day 2Day 3Day 4Day 5
Twinkle Var ATwinkle Var BTwinkle Var CTwinkle Var DTwinkle Theme
Twinkle Var XMary Had A LambFrench Folk SongLightly RowSong of the Wind
Go Tell Aunt RhodyO Come, Little ChildrenMay SongAllegroPerpetual Motion
Long Long AgoAllegretto

AndantinoRigadoonEtude
Happy FarmerMinuet in CMinuet #2Long Long Ago with variationMay Time
Minuet 1Minuet 3

Judas MaccabaeusHunter’s ChorusMusette
March in GWitches’ DanceTwo GrenadiersMoon Over the Ruined CastleGossec Gavotte
BourreeBerceuseMoon Over the Ruined Castle – 3rdLully GavotteBoccherini Minuet
Moon Over the Ruined Castle – 4thScherzoBeethoven Minuet in GGavotte in C minorMinuet # 3 + minor section
HumoresqueLa CinquantaineAllegro ModeratoBreval Sonata AllegroBreval Sonata Rondo
Marcello Sonata AdagioMarcello Sonata AllegroBach Minuets 1 & 2 from Suite 1Chanson Triste

Monday, February 16, 2015

Reading Music, part 2 - The Basics of Pitch

Music reading is a huge component to playing an instrument. As you work with your child during the home practice, you will end up learning to read music with your child. What a cool thing!

There are two basic parts that make up reading music, each with it's own set of symbols. One, which is covered in this post, is pitch or the sound the instrument produces. This post introduces you to what those symbols look like and where they live on the musical staff.

The musical staff is simply 5 horizontal lines that run parallel to each other.


There are 5 lines with 4 spaces in between. All the notes live on this musical staff as well as other symbols that give us information on what or how to play. 

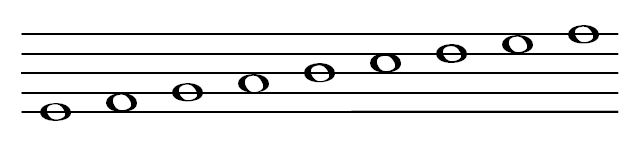
The music notes are the oval shaped symbols that reside on the staff. 


They are placed on the lines and spaces on the staff and can move in any direction on the staff. These symbols and their specific placement on the staff indicate which pitch or sound to produce on the instrument. 

The location of the note on the staff determines how high or low the pitch will sound. The lower the note is on the staff, the lower the note is in pitch. The higher you find the note, the higher it will sound. 

Like reading words, we read music left to right. Also, much like English, there is a musical alphabet. The musical alphabet is very similar to the English alphabet; it uses the first 7 letters: 

A B C D E F G

When G has been reached, the alphabet goes back to the beginning and starts the cycle all over again. These are the only letters we use to name notes (there is no H!). 

Where all these notes and their assigned letter names live on the staff depends on which clef symbol is placed at the beginning of the staff. Though there are 3 different types of clef symbols, in cello we primarily use the bass clef. It is the clef that is used for all the lower pitched instruments (such as the bass, bassoon, trombone and lower voices). 


Now we can discuss which notes on the staff correspond to our open strings. An open string is a string that has no fingers placed on it. Remember the Ants Song? These are the symbols for those notes.


Then, we can figure out which string or finger placement all these notes correspond to. First, we need to establish the cello hand finger numbers. On the left hand, pointer finger is finger number 1, then we continue labeling until we reach the little finger, or finger number 4. The thumb is just thumb!


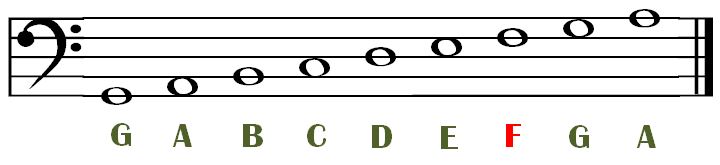
Below is the names and the finger numbers on each individual string, starting with the highest string, the A string. 


As you can see, as the notes go up, they progress through the alphabet in order. 


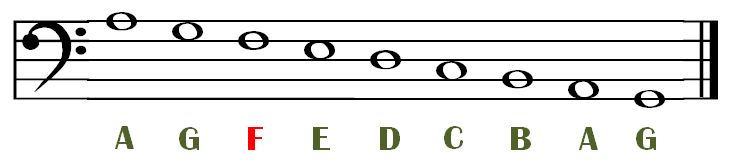
When the notes go down the staff, they go backwards in the alphabet. 


If we were to draw out a grid with all the note names and finger numbers on all four strings, below is what it would look like. Reading left to right, is lowest string to highest (as if you were looking straight on at the fingerboard). The finger numbers are to the far right, beside the A string. 


Please note that 2nd finger is not included. In the beginning, we don't use 2nd finger, but we will eventually! This just simplifies things. There are many more notes that go on this grid and as students and parents learn more, those notes can be filled in on a physical note grid or on the cognitive note grid/fretboard we have in our minds. 

When I think about the notes in the cello, I am quite literally thinking about an imaginary fretboard on my instrument and all the notes we play live on that fretboard. My goal is to develop the same thinking in my students. This leads to a much more flexible and fluent approach to playing the cello - we can navigate the whole instrument no matter which fingering or position is required of us. 

Later on, we end up with something like this, but mapped out in our brains!


Back to the staff, you'll notice on the C string and the A string, some of the notes dip below the staff as well as above. Especially in the case of the A string, there are more notes above and below the staff. Our open C string is as low as we will go. However, the A string notes can continue getting higher and higher. In order to indicate those notes on the staff, we use ledger lines. The purpose of ledger lines is to give us freedom to write notes above and below the staff as we need them. Basically, they are an extension of the musical staff. 

Just like on the staff, as we you move in ledger lines, the notes get higher and you go forward in the alphabet. 


The reverse is true for going down in ledger lines - the notes get lower and you go backwards in the alphabet. 


Just note (hahah, no pun intended) that we will never go below this pitch because it is our lowest string and we cannot go lower:


This covers the basics for pitch on the staff and some fingerboard geography and should help you as you learn along side your child how to read music. Music reading is pretty easy but it does take some time to get the hang of it and become fluent and comfortable. But just keep in mind, these are the basics and we continue to build on these skills as we learn more notes (like second finger!). 

What I've not covered is rhythm. Look for another post about rhythm!

Though I've separated pitch and rhythm, understanding both and their corresponding symbols is integral to reading music. You will not get all of the information just by reading the notes or vice versa, only reading the rhythm. Music is made up of both. It's just easier to digest by breaking it up. :)


Wednesday, February 11, 2015

This American Life: Batman


If you have an hour, or even just a few minutes here and there, listen to this episode of This American Life!

This episode has a lot of applications to learning, including the expectations we set for our children and for ourselves, grit and mindsets. Featured is psychologist, Dr. Carol Dweck and you can read more about her work here. Plus, it's such an inspirational story!

Monday, February 9, 2015

Reading Music, part 1 - When do you start reading music?

I thought I'd break down reading music into a couple of different parts. It's a meaty subject so one post is waaaaay too much information.

First, in this series of note-reading, is a discussion of when students begin reading music. It is one of the most frequently asked questions so I thought I'd address it before delving into the mechanics of reading music.

Reminder: this happens at different ages and stages for every student. There is no prescribed age, piece or magical calendar date when we start reading. I look for a number of things before I believe music reading is appropriate to add to a student's repertoire of skills.

First off, we delay reading because that's also how we learn language. We don't start reading words when we began speaking - it happens much later, often many years later. Children become quite fluent in their language before reading is introduced. Learning to read music is exactly the same process. Musical skills, playing beautifully and playing in tune must happen before music reading is begun.

Before introducing music reading I look for these things:

1. Posture, posture, posture
I cannot stress enough how important it is to first and foremost have secure, solid and correct posture. Music reading requires adding an additional skill on top of everything a student already knows, which also requires focused attention. One cannot focus on cello hand position, intonation, bow hold, bow control AND reading music off the page. It's just too much! Posture has to be absolutely solid before adding a new skill. Just like building a house, you can't build on shaky foundation or else everything will fall down.

2. Confidence and ease of playing
Similar to posture, all the skills related to playing the cello must be easy, comfortable and confident. Again, adding too much will result in too many things going on which leads to frustration. If any one aspect is not near automatic, it becomes infinitely more difficult to add an additional and complicated layer. Music reading inherently takes attention away from everything else so that means everything else has to be fluent and easy in order to dedicate brain power to reading. All the previous skills have to be comfy, easy, solid and secure.

3. Knowledge of fingerboard geography
Fingerboard geography refers to the names of the pitches and where they live on the instrument. This must be learned and ingrained before reading music. Students need to be able to identify the notes by name on the instrument as well as locate any given pitch. For example, can they name the notes in Twinkle? Can they find F# on the D string? What is the name of the note underneath the 4th finger on the A string?

To further complicate things, unlike the piano, a single note may live in more than one spot. For example, the pitch of our open D string can also be played on the G AND the C strings. Having the beginning stages of a cognitive map of the fingerboard is absolutely essential to understanding this especially when we start moving the hand around the instrument. We build on this cognitive map as we learn more pitches but a foundation must be there first.

Students must know the names of the notes and where they live on the instrument before attempting to read. It's like trying to identify a color you've never seen before or trying to read and understand the word 'car' when you don't know what that object is. There must be prior knowledge of the 'language' (i.e. names of the notes and where they live) before attaching a symbol to that language.

Then, students must be able to identify the written note symbol on the page by the name of the note, not the finger number. This is critical but not difficult. It's very much like recognizing letters of the alphabet. However, all too often do students learn to 'read' music by following finger numbers. It's not a bad way to start but it becomes a problem when 4 on D (the note G) is indicated to be played with a 2nd finger. In other words, when the hand is no longer in one position on the neck and the hand starts moving around and shifting to different positions. I avoid this approach all together and try to rely on finger numbers a little as humanly possible.

Keep in mind, the finger numbers all throughout the Suzuki books are for you, the parent, not the child.

4. Understands reading concept
Reading music is not unlike reading words. It's essentially the exact same concept just a different 'language', if you will, with a different set of symbols. Understanding the basic concept of reading words is necessary because the two skills are so alike. Then students can apply the same concept and understanding to reading the symbols of music.

5. Solid concept of intonation
Students need to have a solid concept of sound, intonation and pitch. Without this, notes are near meaningless. 3rd finger is not F# if it's not on the correct spot on the fingerboard and F# is not F# unless the right pitch, the right frequency, produced by putting the finger in the correct place. It's either F# or it's not. Much like the color 'red' is not 'red' unless light waves form the correct wavelength. This aspect of playing has to be solid and understood, though it's not necessarily explicitly explained.

String instruments are challenging in that we can't just hit a key and F# is perfectly in tune. There's unfortunately a lot of wiggle room in terms of where the finger can go. This is where the concept of intonation and what's 'in tune' is so important. Even though students are in no way expected to understand or know about harmony, music theory and the physics of sound, they can still learn to hear when a pitch is too low or too high relative to other pitches.

***

There are a lot of skills involved in reading music plus a lot of dots of information that need to be connected in order for all this knowledge to be readily accessible, usable and applicable.

Students need to be able to take in a lot of information, translate it to meaningful knowledge and use that knowledge to produce sound. This means juggling, sorting through and interpreting a lot of information. For example, the page will be a note on the staff and a finger number, which students need to figure out what that pitch is and where it lives on the instrument. Also, students will have a sound concept in mind of what that pitch should sound like, much like singing a tune in your head (read about audiation for more about this). Then there's a physical skill attached to make the sound happen that involves placing the indicated finger down in the right spot, on the right string and hearing whether or not that is the correct pitch. Whew.

All these bits and pieces of information need to be weaved together in order for music reading to become fluent. If one aspect of music reading is weak, it can impact the skill as a whole.

This takes time. Lots of time. It's totally okay if it's slow going at first especially because there is so much new information and it just takes time and practice to sink in. I don't expect this to make sense or 'click' the first time it's explained because it just won't. But rest assured, it will sink it and it will make sense. This goes for many musical concepts, by the way.

One more reassuring note, I typically start music reading about halfway through Suzuki Book 1, when students reach Perpetual Motion. By this point, students have typically achieved all of the above things, whether they know it or not. Most of these things are built into my curriculum and sequence of teaching. So even though I don't explicitly say it, we are preparing for music reading all the time! And it all begins with posture. :)

Monday, February 2, 2015

Learn how to speak Italian! (so you can follow the directions in the book)

In addition to learning how to read music, students also get to learn some fun and very important Italian words! Traditionally in music, instructions for the speed (tempo), bow style, dynamics (loudness/softness), etc., are in Italian. Some composers later on use French and German, depending on their nationality, but for the most part, Italian instructions are used. And for the entire Suzuki Book 1, Italian is used.

Below is a list of commonly used Italian words as well as symbols broken up by the type of instruction they give. This is by no means a comprehensive list - there are as many symbols and terms to fill up an entire encyclopedia of music (these exist) but this will cover you through Book 1.

Tempo (speed)

  • Allegro - fast, lively, 'perky'
  • Allegro giocoso - fast and playful
  • Allegro moderato - moderately fast
  • Allegretto - fairly brisk tempo but slower than Allegro
  • Andante - walking speed
  • Andantino - slightly slower than Andante
  • Grazioso - gracefully
  • Moderato - moderately; moderate speed

Dynamics (how loud or soft)

  • forte (f) - loud; 'strong'
  • piano (p) - soft
  • mezzoforte (mf) - medium loud
  • mezzopiano (mp) - medium soft
  • cresc./crescendo/ < - gradually get louder
  • dim./diminuendo/ > - gradually get softer
  • decresc./decrescendo/ > - gradually get softer
  • meno mosso - much less

Bow Articulation Marks (what kind of sound does it make)

  • legato - smoothly; French Folk Song
  • staccato - short, crisp; marked with a dot above the note; Song of the Wind 
  • tenuto - to hold; marked with a dash above the note; Allegretto
  • marcato - strongly articulated; marked with a > or ^; 
    • related to martelĂ©, or an attack with the bow that is forceful and then released; think Rigadoon. 
  • detachĂ© - connected, on the string; back and forth bow; long bow Twinkle

Other Directions

  • pizzicato or pizz. - pluck with the finger
  • arco - use the bow
  • rit./ritardando - slow down
  • poco rit. - slow down a lot
  • dolce - sweetly
  • a tempo - return to the original speed
  • sempre - always

Commonly Used Symbols


Wikipedia has a great glossary of terms & symbols for any additional terms or symbols you may need going forward.

Monday, January 26, 2015

Cello & Bow Care

Now that you have your instrument, how on earth do you take care of the thing?! Below are some guidelines to follow and helpful hints for caring for the instrument.

First, just as a reminder, here are two images with the parts of the cello & the bow. 


***

Cello & Bow Care Guidelines
  • General Guidelines
    • When removing the instrument from the case, remove the bow first. Then, always put the bow in the soft case after the instrument when packing up. The bow is fragile and the case is very flimsy. Trying to get the instrument out of the case with the bow still inside can result in a broken bow. (see below for directions)
    • After playing, use a clean, soft cloth (I use an old t-shirt) to remove rosin from the strings, instrument and bow stick. Do not use any furniture cleaners, oils or alcohol on the instrument.
    • Place the instrument and bow in its case or in its stand after playing. Don't leave it on the floor! It usually gets knocked over by a sibling, dog, parent, the cellist...Investing in a cello stand is a great idea. It keeps the instrument off the floor but still readily accessible by the student. Most cellists (myself included) are deterred from practicing by just having to get the instrument out of the case. The stand eliminates this annoying task!
    • Do not put anything in the case with instrument except what was meant to go there. There is at least one pocket on the case. Put all accessories in the pocket. Or carry a separate bag with all your cello accessories.
    • No one but the string student should handle the instrument, including brothers, sisters, and/or friends.
    • Hold the instrument only how your teacher has instructed. Never hold the instrument by anything except the neck.
    • As a rule, the strings and bow hairs do need to be replaced. This likely won't be something you will run into frequently as students tend to change instrument often but it's a good thing to know.
  • Bow Rules
    • Loosen the bow hair, but not so much as to allow the hair to touch the stick or for the individual hairs to separately hang loose. Never try to take the bow apart. You may have seen me do this in the lesson but do not replicate it.
    • Never, ever, EVER touch the hair of the bow, nor allow anything except rosin to come into contact with it. Do not attempt to clean it. The horsehair is intended to be coarse and the rosin makes the hair extra sticky so it can grip the strings. Oils and dirt from our skin counteracts the stickiness of the rosin and weakens the coarseness of the hair. Rehairing the bow can be expensive and you'll have to do this if you touch the bow hairs a lot.
    • Never use the bow or instrument for anything other than practicing or playing. Never hit the bow on anything. It is not a sword! Also, watch where your child is swinging that bow...there have been a few close calls. No one wants a bow in their eye.
    • The bow hairs get stretched out from repeated tightening and loosening and needs to be replaced from time to time. Also they get pretty gross with all the rosin caked on. The bow needs to be re-haired about once a year and, in Austin, runs around $60.
  • Cello Rules
    • Never bump or jar the instrument sharply, even while it is in its case. Bumping the instrument against another object may damage the wood, cause the bridge to slide out of alignment or cause the sound post inside to fall down.
    • If the bridge moves, don't touch it! Have your teacher or the rental shop fix it for you. Often times, moving or removing the bridge will result in the soundpost falling down. Not a huge deal but something your instrument shop will have to fix.
      • the soundpost is a dowel stick inside the instrument that is help in place by the pressure of the front and back of the instrument. It's not glued in, just merely held in place by wedging it in. If pressure from the instrument is suddenly released, like the bridge falling off, the soundpost will also fall down.
      • I can fix a moved or fallen down bridge but I cannot fix a fallen soundpost.
    • Bridges (like soundposts) are not glued in place, but are held in place by the pressure of the strings, which allows them to be replaced and adjusted as needed. If the bridge pops off, don't glue it back on! Also, wait for your teacher or the instrument shop to fix this. It has to be in a particular spot and place on the instrument a particular way. It's possible to put it on backwards.
    • Do not allow the instrument to get too hot or too cold. NEVER leave an instrument in your car, especially the trunk. Excess heat and humidity can cause varnish to melt, even in the winter. Extremely cold temperatures can cause wood to shrink, and the accompanying dryness may possibly cause cracks or separate of pieces to develop. Do not leave the instrument near an air conditioner or a fireplace. Think about it this way: if you are uncomfortable (too hot or too cold), the instrument is, too. Any extremes are terrible for the instrument and cause all sorts of havoc.
    • If an accident occurs or a string breaks, take it to the shop where the instrument was rented or purchased for repair. Never attempt to repair the instrument yourself.
    • Unless your teacher has showed you how, never turn the pegs. Improper turning 
    • Strings get old and when that happens, they go false and are difficult to tune, don't hold being tuned or simply sound off. They then need to be replaced. How often? Probably once a year. A set, depending on the brand, runs anywhere from $50 - $100. Consult your teacher before purchasing new strings.
***
Please help your child to be careful and gentle with the instrument and bow as a rule. Accidents, bumps and drops happen but don't make this a habit. Establish early on that it is not a toy but rather a fragile and pricey instrument that needs to be cared for regularly. 


***

How to Unpack & Pack the Cello
    Unpacking the Cello
    1. Lay cello case on back, on the floor
    2. Remove bow
    3. Unzip cello case
    4. While holding the neck of the cello, lift the front of the case and gently pull the cello out
    5. Set cello on side
    6. Adjust the endpin length 
    *When unpacking the cello, the bow is always removed first*

    Packing the Cello
    1. Push the endpin back inside the cello and secure the screw.
    2. Place the scroll inside the case first, then slide the rest of the body inside.
    3. Zip case
    4. Loosen bow.
    5. Place bow inside case. 
     *When packing the cello back up, the bow is always placed inside last*

    Rest Position (on the floor)

    In rest position, the cello is placed to the left of the chair, bridge facing out towards the left and endpin forward. When placing the cello on the floor, gently and quietly move the cello with the left hand securely around the neck and the right hand holding the rib edge/C bout. 


    ***

    While it seems like there are a lot of DON'Ts for the instrument I have one word of reassurance. The little cellos are pretty durable. I'm not inviting you or your child to man-handle the instrument but a bump here or there won't be a devastating blow. Even when the cello gets kicked over or dropped - yes, this happens, a lot - it's okay. The instrument will likely go out of tune but that's typically the worst of it. However, repeated drops, bangs and bumps will result in cracks or open seams (which are very expensive fixes) but the occasional and accidental bump won't harm the instrument long-term. 


    Monday, January 19, 2015

    Cellos & Supplies for the Lessons

    Though this is intended for families new to playing an instrument, many current families will find this information about cellos, renting/buying and supplies very helpful. 

    Where can I get a cello?

    There are two different ways to go about this: securing an instrument from a local shop or renting from a national retailer. Below is a list of local Austin shops that rent instruments and sells accessories as well as two national retailers that also rent instruments nationwide. Most rental programs are very similar, if not the same - you pay a monthly rental fee that may or may not include insurance (optional, usually, though I recommend it). A portion of the money you pay for that rental goes toward the eventual purchase of an instrument. Buying a cello is great but I recommend waiting until either your child isn't growing so swiftly (i.e. needs a new cello size every 6-12 months) or your child has reached the full-size cello. You are buying an instrument so you want to make sure your child will use if for a longer duration of time or else you'll have a small cello on your hands that no one can play.

    Austin Instrument Rental Shops

    Blackerby Violin Shop on W. Anderson
    Violins Etc. on Burnet & 2222
    Craig's Violins in Lakeway
    Westbank Strings in South Austin on Manchaca

    National Rental Shops
    William Harris Lee is not a local retailer but rents instruments online and will ship the instrument to you. Initially, the cost may be more expensive due to shipping, but the monthly rental fee is comparable to local shops and the instruments are high quality student instruments.
    Johnson Strings also has a very similar rental program to WHL. 

    You may find other national shops that rent, I'm just familiar with WHL's rental instruments - I had a number of students in Atlanta rent instruments from the shop in addition to current students in Austin having a great experience with WHL's instruments.

    What kind of supplies do I need?

    Other Supplies Needed
    Endpin strap - I highly recommend/require this rockstop/endpin strap. It attaches to the chair and doesn't slide on the floor, maintains the correct length so there's no guessing where it goes on the floor in front of the chair
    Suzuki Book 1 - Your child won't need this as much as you will at the beginning for reference. I prefer the physical copy to take notes in, plus you'll have it when your child does need it. But if you prefer a digital copy, you can get the Suzuki Book 1 Digital Download on iTunes for iBooks.
    Suzuki Volume 1 & 2 Recordings - digital downloads: YAY!!!
    Chair/Stepstool - this is a tricky and detailed one. First, here's how to determine if a chair is a good cello chair height:

    Chair Sizing
    Sit your child on the edge of the chair - the edge is important. Do the feet completely touch the floor comfortably? The feet must be completely flat and comfortable on the floor, with no straining or reaching to touch. With the child's torso tall (think a tall tummy, rather than straight back), are the thighs at approximately a 100-110 degree angle? Are the knees lower than the hips? We do not want a 90 degree angle with the torso and thighs - this is terrible for the back and posture. A too-short chair will create this 90 degree angle while a too-tall chair creates an angle larger than 110 degrees. We need one that's just right. :)

    Below are two photos, with thanks to my dear friend Kelsey, demonstrating a good seated cello posture.


    I prefer a chair without a back - chairs with backs tend to encourage sliding into the back of the chair and cellists need to sit on the edge - but I'm not terribly picky about back/no back. It must have a leg the endpin strap can attach to. Some of the chairs and step-stools I've seen don't work well with the strap and we've had to jerry-rig it to make it work. But in general, if it works, it works! It really depends on what you are comfortable with carrying around and what works best for you and your child. Some prefer a more portable option, others favor the adjustable feature. Below is a list of a few options recommended by parents with some pros and cons to each. Keep in mind, your child will grow no matter what so these chairs aren't permanent by any means.

    Drum stool
    pros: adjustable, somewhat compact-able/foldable tripod legs, great for endpin strap, cushioned seat; 
    cons: not lightweight, little more pricey ($35-40)
    Folding step stool 
    pros: foldable, lightweight, easy to carry around, inexpensive (about $10);
    cons: not adjustable, strap is sometimes difficult to attach to the leg;
    IKEA children's chairs 
    pros: you probably already have one (or more) around the house, generally lightweight, great for endpin strap attachment; 
    cons: not adjustable, folding and kind of a pain to carry around
    IKEA stool - I have this in my studio right now
    pros: great for older students, lightweight; 
    cons: not adjustable unless you cut the legs shorter (it's been done!)
    Shower chairs - yes, this is what you think it is. 
    pros: adjustable, lightweight, can come in many colors, strap attaches easily; 
    cons: clunky to carry around, can be hard to find in stores but readily available online. 

    Any one of these are great options - it just depends on your preference, what your child is comfortable on and what you are okay with carrying around. The chair thing is a pain but it's not a permanent situation. At least it's not a harp!