I hope everyone has a wonderful and relaxing spring break. For those who are traveling, have a safe trip!
Looking forward to seeing everyone back and refreshed next week!
Monday, March 16, 2015

Monday, March 9, 2015
How to Practice: Setting Goals vs. Time
One of the most-often asked questions I get as a teacher is "how long should my child be practicing?"
This is a completely reasonable question but it's not so easy to answer. There's not a concrete answer, no black-and-white time limit each student should adhere to.
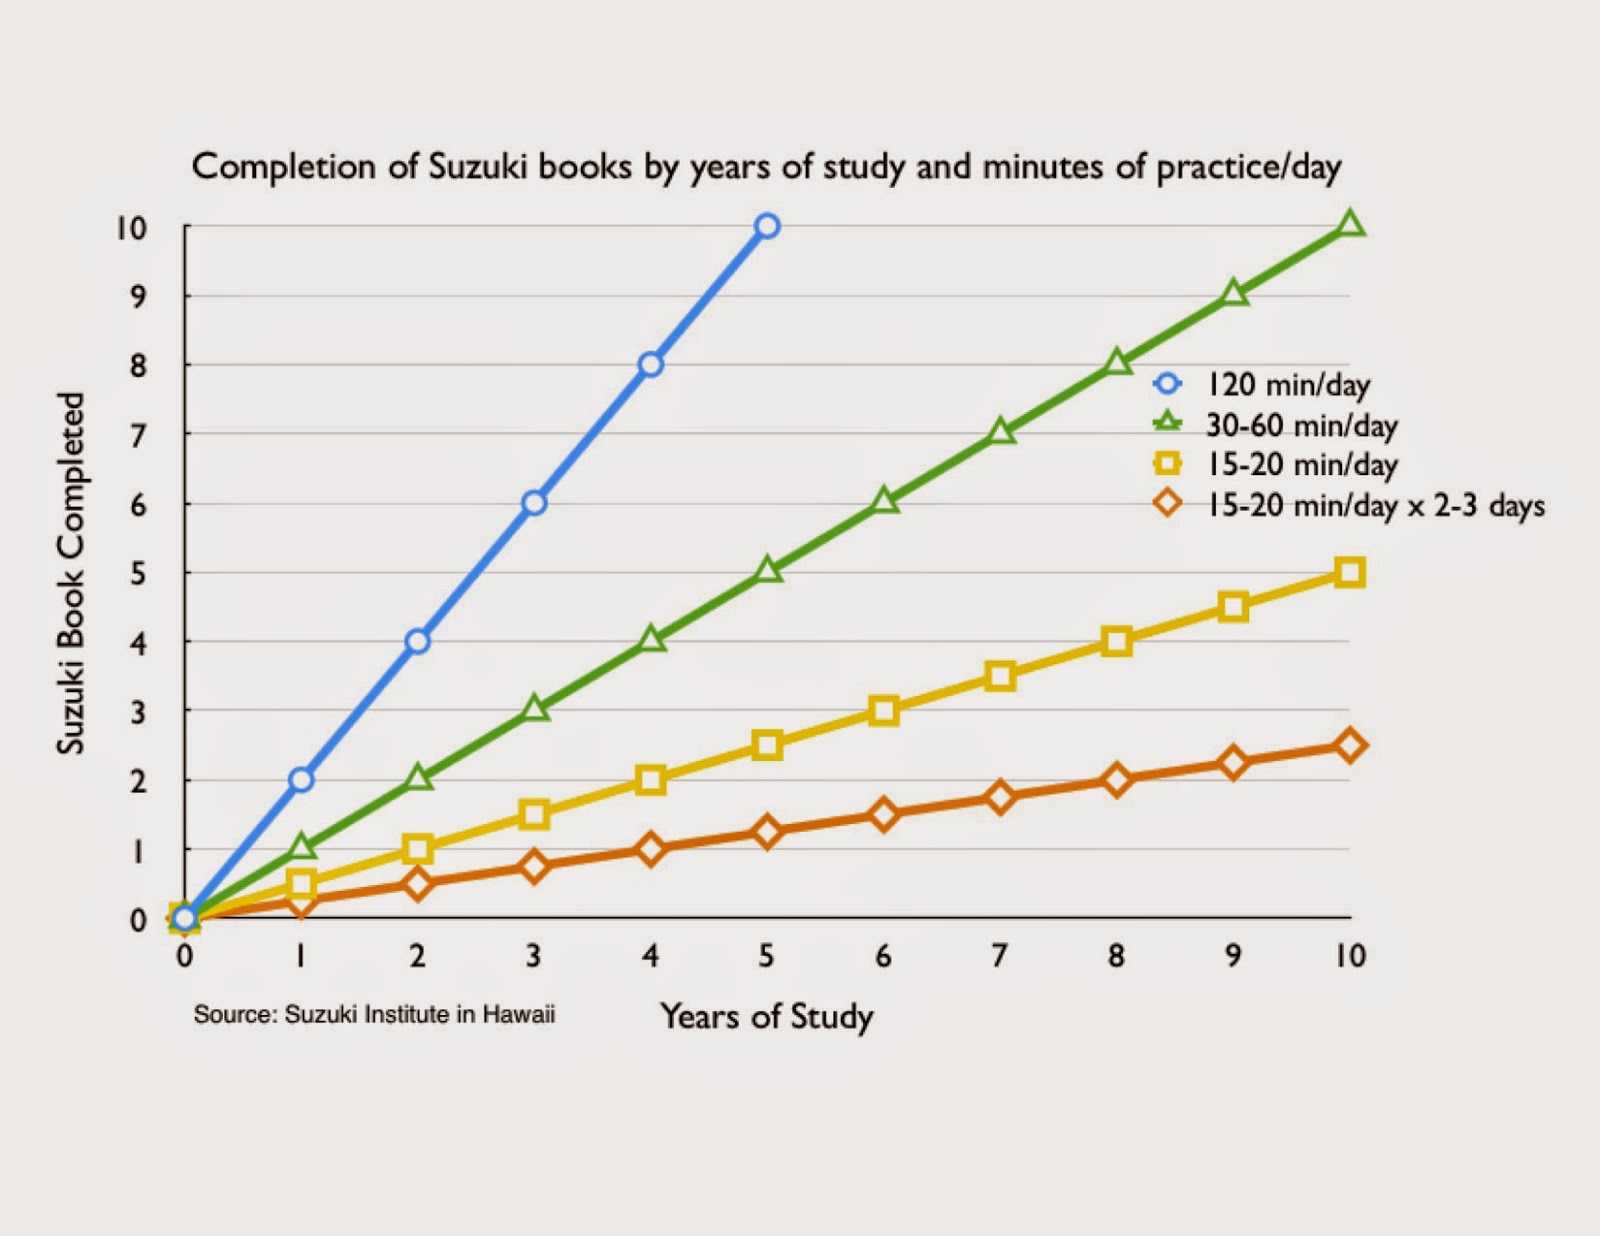
Many of my students have seen this graph in my studio:
This is a completely reasonable question but it's not so easy to answer. There's not a concrete answer, no black-and-white time limit each student should adhere to.
Many of my students have seen this graph in my studio:
While this does give a lot of information on the effect of length of practice on progress, it doesn't quite tell the whole story. Duration and frequency of practice is important and there certainly is a relationship between practice duration, practice frequency and progress. But duration and frequency are not the only aspects that determine progress and success in learning a musical instrument.
First off, how do you define progress? I try to de-emphasize the notion that progress is simply moving through the books and learning the next piece. First, progress looks differently for every kid. Also, progress in learning a musical instrument involves much outside of learning the next piece in the book. Progress for me means a number of different things. Progress means:
- deeply, very deeply, learning skills
- the ability to transfer current knowledge and skills to new domains
- learning how to figure things out on your own with limited outside help
- one day not needing me as a teacher (yes, I am essentially trying to put myself out of a job)
Progress is an overall increase in the educational well-being of the student and helping develop the student into a well-rounded musician and human being.
Progress does not only mean learning the next piece and then the one after that.
Looking closely at the graph, it indicates that a student who practices two hours a day will learn 2 books a year. In my experience, Book 1 takes the longest for most students to finish. It's the foundation book and I like for students to take 2 years to complete Book 1. That way all those foundation skills and techniques are rock solid and building on those skills won't result in a total collapse or frustration. To list them all would take quite a while, but they include:
- focus
- singing
- hearing pitch
- holding the cello properly
- holding the bow
- using the bow correctly on the cello
- playing with a good tone
- playing in tune
- adjusting when out of tune
- playing on all four strings
- playing with different finger patterns
- staccato, legato, marcato,
- preliminary shifting exercises
- fingerboard geography
- note reading
- tuning the instrument
- playing with others, etc.
WHEW. That's a lot of skills. And that doesn't even come close to covering them all. Book 1 takes time. Yes, it's tedious and Twinkle is borderline painful because it takes a long time but your child will greatly benefit from fastidious development of knowledge and skills. It's hard to see it in the moment but just know there is light at the end of the Twinkle tunnel.
As for learning two books a year with 2 hours of practice, sure, it's possible. But there are lots of other things that students need to learn outside of the Suzuki repertoire that will take time away from strictly getting through the books. For example, there are several pieces and technique books outside of the Suzuki repertoire I incorporate in my curriculum to develop well-rounded and artistic musicians.
The Suzuki books are great but solely focusing on achieving completion of those books is akin to trying to become a well-rounded chef by only cooking through one series or one style of cookbooks. There is more knowledge that needs to be learned from other sources. Yes, this takes more time but it's worth it for the development of well-rounded musicians and accomplished learners.
Also, many students start between the ages of 3-6. Can you really get a 3 year-old to practice for 2 hours? Nope. How about a 6 year-old? Probably not. Not only is it hard to get a little one to focus and pay attention for long periods of time, they simply do not have the physical endurance to withstand long practice sessions. It ain't gonna happen. That isn't to say a highly dedicated 7 year-old can't devote 2 hours daily to practice but I think that delves into other issues I'd rather not get into here. I believe kids should be kids. Enough said.
***
If practice isn't determined by a set time limit, than what should it be determined by?
Goals. More specifically, the setting and achievement of specific goals within a given practice session. This may take more time at first but practicing without setting a goal is a lot like getting into your car without a destination in mind. You end up driving around in circles for a long time before (maybe) arriving where you want to be. And you waste a lot of time. I'm not about wasting time.
Practice, lessons and rehearsals are made up of many, many aspects. But what we need to do as teachers and parents is help break everything down into the smallest unit of learning, identify accomplishable goals and set up students to accomplish those goals.
Set achievable goal and accomplish that goal. Don't mindlessly play through everything without a goal in mind for each piece. Even if the goal is to review, make the goal 'review with a good bow hold' or 'play review pieces with the best sound possible'. And remind your child about the goal or point before they play each piece. This will bring a very different focus to the practice and also results in less frequent messy repetitions of the pieces. Every messy or sloppy performance is a reinforcement of that skill. Please avoid this! We don't want to reinforce poor cello playing!
Here's a few examples of clearly defined practice goals:
- Practice the preview spot in Song of the Wind 10 plucked times or until it looks easy for the fingers, with clear, ringy notes every time.
- Practice the shift in Minuet No. 2 12 times with a moving thumb and in-tune G#.
- Practice the 3rd section of Perpetual Motion until it feels easy and effortless before playing the whole song. Then add it to the rest of the song.
- Practice the bowing in line 1 of Minuet in C 6 times, in a row. If there is a mistake in one, add an additional repetition, making it 7, etc.
- Play Mississippi Stop Stop Twinkle for good, clean 'stops' on every Mississippi Stop Stop.
- Practice X piece until it feels easy, not until it's correct.
My goal for every practice is to make any given skill easy rather than getting it right. Getting it right once does not mean the skill is learned. However, practicing something for ease automatically ensures it will be correct and repeatedly correct because it's effortless to execute.
If you achieve your predetermined practice goals in 12 minutes rather than the 30 minute you budgeted for practice, fantastic! Go read a book for the remaining 18 minutes. Or practice more! Set another goal and achieve it! You and your child will find this practice much more motivating than playing through everything. The goal was determined and was met - that's a pretty exciting thing! And it makes students want to come back for more because it's such a positive and rewarding experience, much more so than just playing through Allegretto mindlessly thinking about what's for dinner.
***
Next time you pull out the cello to practice with your child, work with your child to determine accomplishable goals at the start of practice or before you start something new during the practice.
Start small. Start with something achievable in a short amount of time - think 90 seconds to 4 minutes maximum. Yup, that short. Don't bite off more than you both can chew. Setting the goal to learn all of Etude when you only have the first 4 notes is setting yourselves both up for failure and disappointment.
Celebrate! Praise your child (and yourself!) on achieving the pre-determined goals.
Happy (goal directed) practicing!
Monday, March 2, 2015
Reading Music, part 3 - The Basics of Rhythm
A few posts ago, I discussed the basics of reading pitch and how to read pitch. The other component to music reading is rhythm. Without rhythm, our music would sound like a robot talking rather than natural human speech.
First step to learning about rhythm and more specifically, how to read rhythm is to find the beat of any piece of music. The beat is the steady rhythm of music, just like your heartbeat. If you can match your heartbeat by tapping to it, you can match the beat of any piece of music.
However, this does take concentration and if you get distracted, you will likely lose the beat. Keep track of it - the beat is the most basic element of rhythm and you'll need it to organize everything rhythm-related around it.
Take Twinkle, Twinkle Little Star for example - can you tap the steady beat? Not the rhythm, but the ever persistent, never stopping beat. If you are familiar with a metronome, a metronome provides a steady, constant beat.
Rhythm is the organized pattern of sound. It's related to the beat in that we organize rhythm around our beat. It does not matter how fast or slow the beat is, we can still organize our rhythm around this basic element.
Once we can find the beat and identify the different between the rhythm and the beat, we discuss how all this looks on the page. How do we know how long to hold a note?
There are symbols with different note values that tell us how long (or short) to hold a note. The duration is always based on the established beat.
But first, here are the basics of the symbols we use to indicate how long or short to hold a note. How long or short the note is to be played is based on it's appearance.
Every note is made of a note head and a stem. Sometimes, there is also a flag.




First step to learning about rhythm and more specifically, how to read rhythm is to find the beat of any piece of music. The beat is the steady rhythm of music, just like your heartbeat. If you can match your heartbeat by tapping to it, you can match the beat of any piece of music.
However, this does take concentration and if you get distracted, you will likely lose the beat. Keep track of it - the beat is the most basic element of rhythm and you'll need it to organize everything rhythm-related around it.
Take Twinkle, Twinkle Little Star for example - can you tap the steady beat? Not the rhythm, but the ever persistent, never stopping beat. If you are familiar with a metronome, a metronome provides a steady, constant beat.
Rhythm is the organized pattern of sound. It's related to the beat in that we organize rhythm around our beat. It does not matter how fast or slow the beat is, we can still organize our rhythm around this basic element.
Once we can find the beat and identify the different between the rhythm and the beat, we discuss how all this looks on the page. How do we know how long to hold a note?
There are symbols with different note values that tell us how long (or short) to hold a note. The duration is always based on the established beat.
But first, here are the basics of the symbols we use to indicate how long or short to hold a note. How long or short the note is to be played is based on it's appearance.
Every note is made of a note head and a stem. Sometimes, there is also a flag.

Each of these things, the presence or absence, will impact the duration of the note.
The chart below tells is a great quick reference to the symbol, it's name and how many beats it is assigned.

However, more often than not, we see eighth notes and sixteenth notes in groups of two or more. Those symbols look slightly different only in that the flags are then connected together to create beams across multiples. Instead, they look like this:
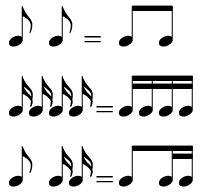
This just makes reading a sequence of eighth notes easier to read.
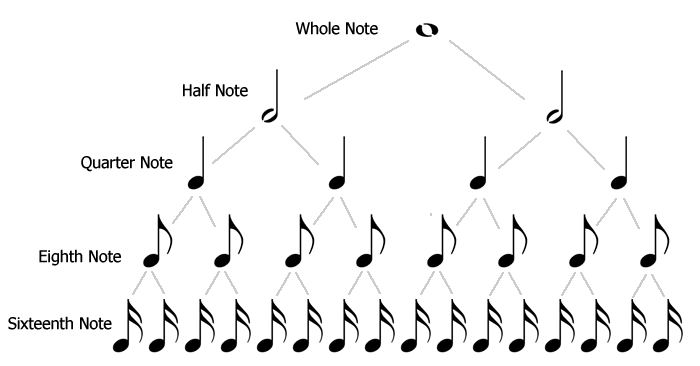
The next image is a note hierarchy which indicates how the durations of notes are related to others. At the top is a whole note. A half note is half the duration of a whole note, so a whole note is as long as two half notes. Likewise, a half note is as long as two quarter notes. A quarter note is as long as two eighth notes, and an eighth note is as long as two sixteenth notes, so on and so forth.
Now these symbols are used for pitches and indicate the duration of the pitch. There is a different (yet very similar) set of symbols used to indicate the duration of silence in music. We call silence in music a 'rest'. There is a symbol with equivalent values to corresponding note duration to indicate silence. Therefore, there is a whole rest, half rest, quarter rest, etc., just like the notes. Just like our note head and stems, rests can have flags, too, that indicate shorter and shorter rest duration.

See the below chart for note values and their corresponding rests.

Just like we count to hold the duration of a note, we count to hold a duration of rests. Please try to not blow through the rests and ignore them! The silence in music is just as important as the sound!
There are a few other items related to rhythm, but I'll cover that in another post. Again, these are the basics to get you started. The other items I leave until later to introduce to students until they have a firm grasp on the basic concepts of rhythm.
Stay tuned! Part 4 will cover: bar line and measures (how we organize music), time signatures & dotted rhythms.
Monday, February 23, 2015
Are you reviewing?!
Hey, are you reviewing old pieces daily? If not, here's a great way to do it! Follow the chart to break up review into smaller portions. That way, you are not reviewing everything, everyday (that might be a lot depending on what book you're in) but you do cover everything in the span of a week.
It's easy to get excited about a new piece but don't forget about review pieces. The skills in the Suzuki repertoire are scaffolded so everything that was previously learned is built on later but made more challenging. When reviewing an old piece, ask your child to think about something specific so it is not mindless repetition of an old song. For example, if your child is working on fixing some bow hold issues, have them play Twinkle and really focus on the bow. The left hand will practically play itself and the additional focus on the bow with reinforce bow hold maintenance.
Suzuki Cello Review Chart for Books 1-4
1. Practice your last 3 pieces everyday
2. Twinkle Variation X is “Flipper the Dolphin”, “Blueberry Blueberry” or any Twinkle rhythm not from the book
3. On the 6th and 7th day, you may choose what to review. Hint: review what didn't go so well!
4. When you are in Book 3 and beyond, you can substitute orchestra/other music for Book 1.
| Day 1 | Day 2 | Day 3 | Day 4 | Day 5 |
| Twinkle Var A | Twinkle Var B | Twinkle Var C | Twinkle Var D | Twinkle Theme |
| Twinkle Var X | Mary Had A Lamb | French Folk Song | Lightly Row | Song of the Wind |
| Go Tell Aunt Rhody | O Come, Little Children | May Song | Allegro | Perpetual Motion |
| Long Long Ago | Allegretto | Andantino | Rigadoon | Etude |
| Happy Farmer | Minuet in C | Minuet #2 | Long Long Ago with variation | May Time |
| Minuet 1 | Minuet 3 | Judas Maccabaeus | Hunter’s Chorus | Musette |
| March in G | Witches’ Dance | Two Grenadiers | Moon Over the Ruined Castle | Gossec Gavotte |
| Bourree | Berceuse | Moon Over the Ruined Castle – 3rd | Lully Gavotte | Boccherini Minuet |
| Moon Over the Ruined Castle – 4th | Scherzo | Beethoven Minuet in G | Gavotte in C minor | Minuet # 3 + minor section |
| Humoresque | La Cinquantaine | Allegro Moderato | Breval Sonata Allegro | Breval Sonata Rondo |
| Marcello Sonata Adagio | Marcello Sonata Allegro | Bach Minuets 1 & 2 from Suite 1 | Chanson Triste |
Monday, February 16, 2015
Reading Music, part 2 - The Basics of Pitch
Music reading is a huge component to playing an instrument. As you work with your child during the home practice, you will end up learning to read music with your child. What a cool thing!
There are two basic parts that make up reading music, each with it's own set of symbols. One, which is covered in this post, is pitch or the sound the instrument produces. This post introduces you to what those symbols look like and where they live on the musical staff.
The musical staff is simply 5 horizontal lines that run parallel to each other.


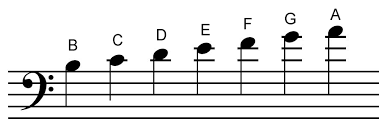
Now we can discuss which notes on the staff correspond to our open strings. An open string is a string that has no fingers placed on it. Remember the Ants Song? These are the symbols for those notes.


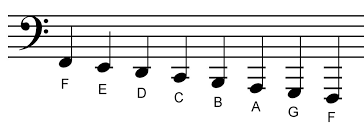

There are two basic parts that make up reading music, each with it's own set of symbols. One, which is covered in this post, is pitch or the sound the instrument produces. This post introduces you to what those symbols look like and where they live on the musical staff.
The musical staff is simply 5 horizontal lines that run parallel to each other.
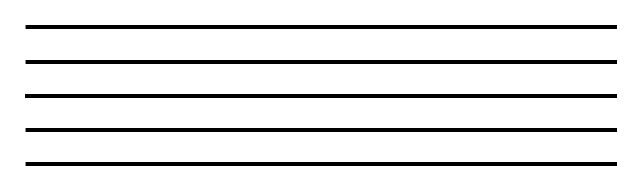
There are 5 lines with 4 spaces in between. All the notes live on this musical staff as well as other symbols that give us information on what or how to play.
The music notes are the oval shaped symbols that reside on the staff.
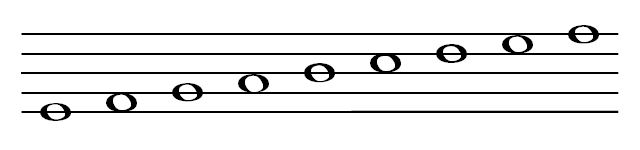
They are placed on the lines and spaces on the staff and can move in any direction on the staff. These symbols and their specific placement on the staff indicate which pitch or sound to produce on the instrument.
The location of the note on the staff determines how high or low the pitch will sound. The lower the note is on the staff, the lower the note is in pitch. The higher you find the note, the higher it will sound.
Like reading words, we read music left to right. Also, much like English, there is a musical alphabet. The musical alphabet is very similar to the English alphabet; it uses the first 7 letters:
A B C D E F G
When G has been reached, the alphabet goes back to the beginning and starts the cycle all over again. These are the only letters we use to name notes (there is no H!).
Where all these notes and their assigned letter names live on the staff depends on which clef symbol is placed at the beginning of the staff. Though there are 3 different types of clef symbols, in cello we primarily use the bass clef. It is the clef that is used for all the lower pitched instruments (such as the bass, bassoon, trombone and lower voices).


Then, we can figure out which string or finger placement all these notes correspond to. First, we need to establish the cello hand finger numbers. On the left hand, pointer finger is finger number 1, then we continue labeling until we reach the little finger, or finger number 4. The thumb is just thumb!
Below is the names and the finger numbers on each individual string, starting with the highest string, the A string.
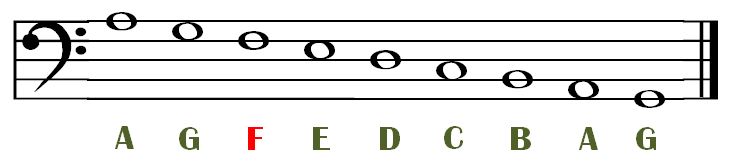
As you can see, as the notes go up, they progress through the alphabet in order.
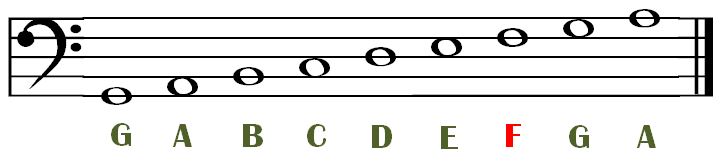
When the notes go down the staff, they go backwards in the alphabet.
If we were to draw out a grid with all the note names and finger numbers on all four strings, below is what it would look like. Reading left to right, is lowest string to highest (as if you were looking straight on at the fingerboard). The finger numbers are to the far right, beside the A string.
Please note that 2nd finger is not included. In the beginning, we don't use 2nd finger, but we will eventually! This just simplifies things. There are many more notes that go on this grid and as students and parents learn more, those notes can be filled in on a physical note grid or on the cognitive note grid/fretboard we have in our minds.
When I think about the notes in the cello, I am quite literally thinking about an imaginary fretboard on my instrument and all the notes we play live on that fretboard. My goal is to develop the same thinking in my students. This leads to a much more flexible and fluent approach to playing the cello - we can navigate the whole instrument no matter which fingering or position is required of us.
Later on, we end up with something like this, but mapped out in our brains!

Back to the staff, you'll notice on the C string and the A string, some of the notes dip below the staff as well as above. Especially in the case of the A string, there are more notes above and below the staff. Our open C string is as low as we will go. However, the A string notes can continue getting higher and higher. In order to indicate those notes on the staff, we use ledger lines. The purpose of ledger lines is to give us freedom to write notes above and below the staff as we need them. Basically, they are an extension of the musical staff.
Just like on the staff, as we you move in ledger lines, the notes get higher and you go forward in the alphabet.
The reverse is true for going down in ledger lines - the notes get lower and you go backwards in the alphabet.
Just note (hahah, no pun intended) that we will never go below this pitch because it is our lowest string and we cannot go lower:
This covers the basics for pitch on the staff and some fingerboard geography and should help you as you learn along side your child how to read music. Music reading is pretty easy but it does take some time to get the hang of it and become fluent and comfortable. But just keep in mind, these are the basics and we continue to build on these skills as we learn more notes (like second finger!).
What I've not covered is rhythm. Look for another post about rhythm!
Though I've separated pitch and rhythm, understanding both and their corresponding symbols is integral to reading music. You will not get all of the information just by reading the notes or vice versa, only reading the rhythm. Music is made up of both. It's just easier to digest by breaking it up. :)
Wednesday, February 11, 2015
This American Life: Batman
If you have an hour, or even just a few minutes here and there, listen to this episode of This American Life!
This episode has a lot of applications to learning, including the expectations we set for our children and for ourselves, grit and mindsets. Featured is psychologist, Dr. Carol Dweck and you can read more about her work here. Plus, it's such an inspirational story!
Monday, February 9, 2015
Reading Music, part 1 - When do you start reading music?
I thought I'd break down reading music into a couple of different parts. It's a meaty subject so one post is waaaaay too much information.
First, in this series of note-reading, is a discussion of when students begin reading music. It is one of the most frequently asked questions so I thought I'd address it before delving into the mechanics of reading music.
Reminder: this happens at different ages and stages for every student. There is no prescribed age, piece or magical calendar date when we start reading. I look for a number of things before I believe music reading is appropriate to add to a student's repertoire of skills.
First off, we delay reading because that's also how we learn language. We don't start reading words when we began speaking - it happens much later, often many years later. Children become quite fluent in their language before reading is introduced. Learning to read music is exactly the same process. Musical skills, playing beautifully and playing in tune must happen before music reading is begun.
Before introducing music reading I look for these things:
1. Posture, posture, posture
I cannot stress enough how important it is to first and foremost have secure, solid and correct posture. Music reading requires adding an additional skill on top of everything a student already knows, which also requires focused attention. One cannot focus on cello hand position, intonation, bow hold, bow control AND reading music off the page. It's just too much! Posture has to be absolutely solid before adding a new skill. Just like building a house, you can't build on shaky foundation or else everything will fall down.
2. Confidence and ease of playing
Similar to posture, all the skills related to playing the cello must be easy, comfortable and confident. Again, adding too much will result in too many things going on which leads to frustration. If any one aspect is not near automatic, it becomes infinitely more difficult to add an additional and complicated layer. Music reading inherently takes attention away from everything else so that means everything else has to be fluent and easy in order to dedicate brain power to reading. All the previous skills have to be comfy, easy, solid and secure.
3. Knowledge of fingerboard geography
Fingerboard geography refers to the names of the pitches and where they live on the instrument. This must be learned and ingrained before reading music. Students need to be able to identify the notes by name on the instrument as well as locate any given pitch. For example, can they name the notes in Twinkle? Can they find F# on the D string? What is the name of the note underneath the 4th finger on the A string?
To further complicate things, unlike the piano, a single note may live in more than one spot. For example, the pitch of our open D string can also be played on the G AND the C strings. Having the beginning stages of a cognitive map of the fingerboard is absolutely essential to understanding this especially when we start moving the hand around the instrument. We build on this cognitive map as we learn more pitches but a foundation must be there first.
Students must know the names of the notes and where they live on the instrument before attempting to read. It's like trying to identify a color you've never seen before or trying to read and understand the word 'car' when you don't know what that object is. There must be prior knowledge of the 'language' (i.e. names of the notes and where they live) before attaching a symbol to that language.
Then, students must be able to identify the written note symbol on the page by the name of the note, not the finger number. This is critical but not difficult. It's very much like recognizing letters of the alphabet. However, all too often do students learn to 'read' music by following finger numbers. It's not a bad way to start but it becomes a problem when 4 on D (the note G) is indicated to be played with a 2nd finger. In other words, when the hand is no longer in one position on the neck and the hand starts moving around and shifting to different positions. I avoid this approach all together and try to rely on finger numbers a little as humanly possible.
Keep in mind, the finger numbers all throughout the Suzuki books are for you, the parent, not the child.
4. Understands reading concept
Reading music is not unlike reading words. It's essentially the exact same concept just a different 'language', if you will, with a different set of symbols. Understanding the basic concept of reading words is necessary because the two skills are so alike. Then students can apply the same concept and understanding to reading the symbols of music.
5. Solid concept of intonation
Students need to have a solid concept of sound, intonation and pitch. Without this, notes are near meaningless. 3rd finger is not F# if it's not on the correct spot on the fingerboard and F# is not F# unless the right pitch, the right frequency, produced by putting the finger in the correct place. It's either F# or it's not. Much like the color 'red' is not 'red' unless light waves form the correct wavelength. This aspect of playing has to be solid and understood, though it's not necessarily explicitly explained.
String instruments are challenging in that we can't just hit a key and F# is perfectly in tune. There's unfortunately a lot of wiggle room in terms of where the finger can go. This is where the concept of intonation and what's 'in tune' is so important. Even though students are in no way expected to understand or know about harmony, music theory and the physics of sound, they can still learn to hear when a pitch is too low or too high relative to other pitches.
There are a lot of skills involved in reading music plus a lot of dots of information that need to be connected in order for all this knowledge to be readily accessible, usable and applicable.
Students need to be able to take in a lot of information, translate it to meaningful knowledge and use that knowledge to produce sound. This means juggling, sorting through and interpreting a lot of information. For example, the page will be a note on the staff and a finger number, which students need to figure out what that pitch is and where it lives on the instrument. Also, students will have a sound concept in mind of what that pitch should sound like, much like singing a tune in your head (read about audiation for more about this). Then there's a physical skill attached to make the sound happen that involves placing the indicated finger down in the right spot, on the right string and hearing whether or not that is the correct pitch. Whew.
All these bits and pieces of information need to be weaved together in order for music reading to become fluent. If one aspect of music reading is weak, it can impact the skill as a whole.
This takes time. Lots of time. It's totally okay if it's slow going at first especially because there is so much new information and it just takes time and practice to sink in. I don't expect this to make sense or 'click' the first time it's explained because it just won't. But rest assured, it will sink it and it will make sense. This goes for many musical concepts, by the way.
One more reassuring note, I typically start music reading about halfway through Suzuki Book 1, when students reach Perpetual Motion. By this point, students have typically achieved all of the above things, whether they know it or not. Most of these things are built into my curriculum and sequence of teaching. So even though I don't explicitly say it, we are preparing for music reading all the time! And it all begins with posture. :)
First, in this series of note-reading, is a discussion of when students begin reading music. It is one of the most frequently asked questions so I thought I'd address it before delving into the mechanics of reading music.
Reminder: this happens at different ages and stages for every student. There is no prescribed age, piece or magical calendar date when we start reading. I look for a number of things before I believe music reading is appropriate to add to a student's repertoire of skills.
First off, we delay reading because that's also how we learn language. We don't start reading words when we began speaking - it happens much later, often many years later. Children become quite fluent in their language before reading is introduced. Learning to read music is exactly the same process. Musical skills, playing beautifully and playing in tune must happen before music reading is begun.
Before introducing music reading I look for these things:
1. Posture, posture, posture
I cannot stress enough how important it is to first and foremost have secure, solid and correct posture. Music reading requires adding an additional skill on top of everything a student already knows, which also requires focused attention. One cannot focus on cello hand position, intonation, bow hold, bow control AND reading music off the page. It's just too much! Posture has to be absolutely solid before adding a new skill. Just like building a house, you can't build on shaky foundation or else everything will fall down.
2. Confidence and ease of playing
Similar to posture, all the skills related to playing the cello must be easy, comfortable and confident. Again, adding too much will result in too many things going on which leads to frustration. If any one aspect is not near automatic, it becomes infinitely more difficult to add an additional and complicated layer. Music reading inherently takes attention away from everything else so that means everything else has to be fluent and easy in order to dedicate brain power to reading. All the previous skills have to be comfy, easy, solid and secure.
3. Knowledge of fingerboard geography
Fingerboard geography refers to the names of the pitches and where they live on the instrument. This must be learned and ingrained before reading music. Students need to be able to identify the notes by name on the instrument as well as locate any given pitch. For example, can they name the notes in Twinkle? Can they find F# on the D string? What is the name of the note underneath the 4th finger on the A string?
To further complicate things, unlike the piano, a single note may live in more than one spot. For example, the pitch of our open D string can also be played on the G AND the C strings. Having the beginning stages of a cognitive map of the fingerboard is absolutely essential to understanding this especially when we start moving the hand around the instrument. We build on this cognitive map as we learn more pitches but a foundation must be there first.
Students must know the names of the notes and where they live on the instrument before attempting to read. It's like trying to identify a color you've never seen before or trying to read and understand the word 'car' when you don't know what that object is. There must be prior knowledge of the 'language' (i.e. names of the notes and where they live) before attaching a symbol to that language.
Then, students must be able to identify the written note symbol on the page by the name of the note, not the finger number. This is critical but not difficult. It's very much like recognizing letters of the alphabet. However, all too often do students learn to 'read' music by following finger numbers. It's not a bad way to start but it becomes a problem when 4 on D (the note G) is indicated to be played with a 2nd finger. In other words, when the hand is no longer in one position on the neck and the hand starts moving around and shifting to different positions. I avoid this approach all together and try to rely on finger numbers a little as humanly possible.
Keep in mind, the finger numbers all throughout the Suzuki books are for you, the parent, not the child.
4. Understands reading concept
Reading music is not unlike reading words. It's essentially the exact same concept just a different 'language', if you will, with a different set of symbols. Understanding the basic concept of reading words is necessary because the two skills are so alike. Then students can apply the same concept and understanding to reading the symbols of music.
5. Solid concept of intonation
Students need to have a solid concept of sound, intonation and pitch. Without this, notes are near meaningless. 3rd finger is not F# if it's not on the correct spot on the fingerboard and F# is not F# unless the right pitch, the right frequency, produced by putting the finger in the correct place. It's either F# or it's not. Much like the color 'red' is not 'red' unless light waves form the correct wavelength. This aspect of playing has to be solid and understood, though it's not necessarily explicitly explained.
String instruments are challenging in that we can't just hit a key and F# is perfectly in tune. There's unfortunately a lot of wiggle room in terms of where the finger can go. This is where the concept of intonation and what's 'in tune' is so important. Even though students are in no way expected to understand or know about harmony, music theory and the physics of sound, they can still learn to hear when a pitch is too low or too high relative to other pitches.
***
There are a lot of skills involved in reading music plus a lot of dots of information that need to be connected in order for all this knowledge to be readily accessible, usable and applicable.
Students need to be able to take in a lot of information, translate it to meaningful knowledge and use that knowledge to produce sound. This means juggling, sorting through and interpreting a lot of information. For example, the page will be a note on the staff and a finger number, which students need to figure out what that pitch is and where it lives on the instrument. Also, students will have a sound concept in mind of what that pitch should sound like, much like singing a tune in your head (read about audiation for more about this). Then there's a physical skill attached to make the sound happen that involves placing the indicated finger down in the right spot, on the right string and hearing whether or not that is the correct pitch. Whew.
All these bits and pieces of information need to be weaved together in order for music reading to become fluent. If one aspect of music reading is weak, it can impact the skill as a whole.
This takes time. Lots of time. It's totally okay if it's slow going at first especially because there is so much new information and it just takes time and practice to sink in. I don't expect this to make sense or 'click' the first time it's explained because it just won't. But rest assured, it will sink it and it will make sense. This goes for many musical concepts, by the way.
One more reassuring note, I typically start music reading about halfway through Suzuki Book 1, when students reach Perpetual Motion. By this point, students have typically achieved all of the above things, whether they know it or not. Most of these things are built into my curriculum and sequence of teaching. So even though I don't explicitly say it, we are preparing for music reading all the time! And it all begins with posture. :)
Subscribe to:
Posts (Atom)